
Electric Underfloor Heating Installation Guide

Below is a guide to help you select the required electric underfloor heating kit for your application and provide basic guidance for installation. However, If you would rather leave the electric underfloor heating installation up to the professionals, please contact our sales team, who will happily provide a supply and installation quote.
Our professional team of installers has prepared this guide to help you navigate the trials and tribulations of electric underfloor heating installation. It will give you the much-needed knowledge and handy tips needed to finish the job. However, always remember to refer to the installation manual provided. This is only a prepurchase basic guide, and the installation manual must always take precedence over this article.
Step 1: Choose a system
Select the appropriate heating system: The final floor covering of the room will dictate which type of underfloor heating mat must be used:
- Wooden laminate or engineered wood flooring require our Rayoflex or Rayomax foil mats
- Standard carpet and underlay then the Rayoflex foil mat must be used.
- Tiles, Vinyl, Stuck down wood floor or carpet tiles the Webtech systems must be used.

Please note the 200w heat mat is only for use under tiles. For any other stuck down flooring you will need to use the 150W systems.
Step 2: Measure your room
Measuring a room for electric underfloor heating involves several steps to ensure you select the right size and type of heating system. Here's a guide to help you through the process:
Calculate the square meterage: Use a tape measure to measure the length and width of the room in meters. Multiply these two measurements together to find the total square meterage of the room. For irregularly shaped rooms, break them down into smaller, more manageable sections and calculate the square meterage of each section separately.
You will need to calculate both the free floor area (for calculating the mat size) and the total area of the flooring (for number of insulation boards required).
Step 3: Calculate the area of electric matting and insulation that you will need
Area of heating mats required—Heat mats must only cover 80-85% of the free floor space (the area free of any permanent fixtures or furniture). Do not overorder, as the mats cannot be shortened.
How many Insulation boards do you need? When measuring areas, insulation boards must be placed wherever the final floor covering is being laid, allowing a minimum of 10% extra for wastage (this includes other rooms that may not have underfloor heating put in to keep floor heights even).
Do I have to put down insulation?: Insulation helps to reduce running costs and warm-up time. It is compulsory to use it under all our foil mats. With the Webtech mats or loose cable they are optional but highly recommended.
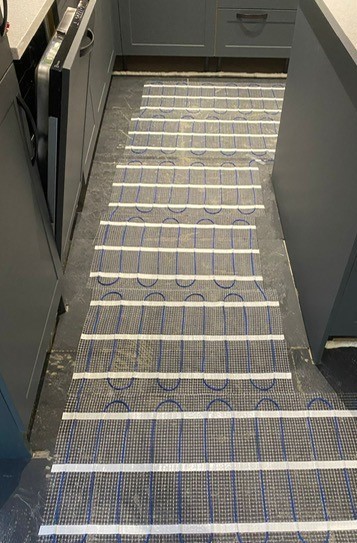 Remember
when laying heating mats, fixed units must be factored out, as mats do not go
under them. See below how we laid this foil kit mat in one of our clients'
kitchens, keeping away from under the island. We have only covered the free
floor space and left a sufficient border around the perimeter.
Get in touch: If you're unsure about any aspect of measuring or installing electric underfloor heating, feel free to contact us. We can provide expert advice and assistance to ensure your system is properly sized, installed, and configured for optimal performance.
Step 4: Get Together Your Tools and Equipment:
Here is a list of tools and equipment required for laying electric underfloor heating.
- Tape measure and a straightedge
- Pencil or chalk for marking
- Utility knife or scissors for precision cutting of the heating elements and insulation boards
- Multimeter to ensure electrical continuity and resistance
- Safety equipment, including gloves and eye protection
- A notched trowel for adhesive and compound application (Webtech system only)
- Impact Drill Driver for securing backer boards (for wooden subfloors only and Webtech system only)
- Electric Mixer with paddle for mixing the self-levelling compound and tile adhesive. (Webtech system only)
Step 5: Surface Preparation
Ensure your subfloor is clean, level, and completely dry. A well-prepared subfloor is crucial for the success of your underfloor heating installation. If fitting our Webtech system, always apply Floor Primer; please ensure a suitable primer is used to prepare the subfloor for the subsequent application of tile adhesive or self-levelling compound. Follow the manufacturer's instructions for drying times.
If laying the Rayoflex sticky mat under carpet, place 6mm wooden battens around the perimeter of the room before
the insulation is fitted. The carpet fitter should fix the gripper rods onto the battens. The gripper rods
will be the same height as the top of the insulation boards for ease of isolation and improved carpet aesthetics
when fitted.
Step 6: Fit the Insulation Boards
If laying our Rayomax or Rayoflex foil range of heating mats you will need to use the Depron Protection Boards. The insulation boards should be fitted in a staggered brickwork pattern (see image). Secure the boards by taping them at the joints. If your final flooring choice is carpet with underlay, use double-sided tape to secure the perimeter of the insulation boards.

If laying our Webtech system with a concrete subfloor, lay Insomax insulation boards and secure them using a suitable flexible tile adhesive.
If laying our Webtech system on wooden subfloors, apply flexible tile adhesive and attach Ultra tile backer boards to the subfloor with screws and washers.
Step 7: Heating Mat Continuity Test
Conducting continuity tests before and after installation is essential. This step ensures that the heating elements function correctly and no damage was done during the laying process.
Step 8: Laying the Mat
Depending on the size of your area, you may be provided with one or two mats. Larger areas will require multiple mats, while smaller rooms can be covered with a single mat. Consider factors such as furniture placement, fixtures, and any obstacles that may affect the installation process.
a. Starting Point: Commence laying the heating mats and floor probe at the location of the thermostat. This strategic placement allows your electrician to connect the cables to the back of the thermostat easily (if two mats have been supplied, both wires connect directly into the thermostat in parallel) The heat mats are self-terminating, eliminating the need to worry about where you'll finish.
b. Mat/Cable Layout: Depending on the size of your area, you may be provided with one or more mats or cables. Larger areas may require multiple mats, while smaller rooms can be covered with a single mat. Manipulate the mats for optimal coverage or space the cables correctly if loose cable systems are used.
c. Leave a Border: Be sure to maintain a 150-200mm border all around the room, keeping the heating mat neatly within the designated area.
In order to get the best coverage in certain rooms, such as a bathroom, the 500mm wide heating mat cannot always be laid
side by side. In these instances, you can remove the heating cable from the mesh and tape it down like we did below.
Be careful to maintain the minimum distance between cables to avoid overheating problems. 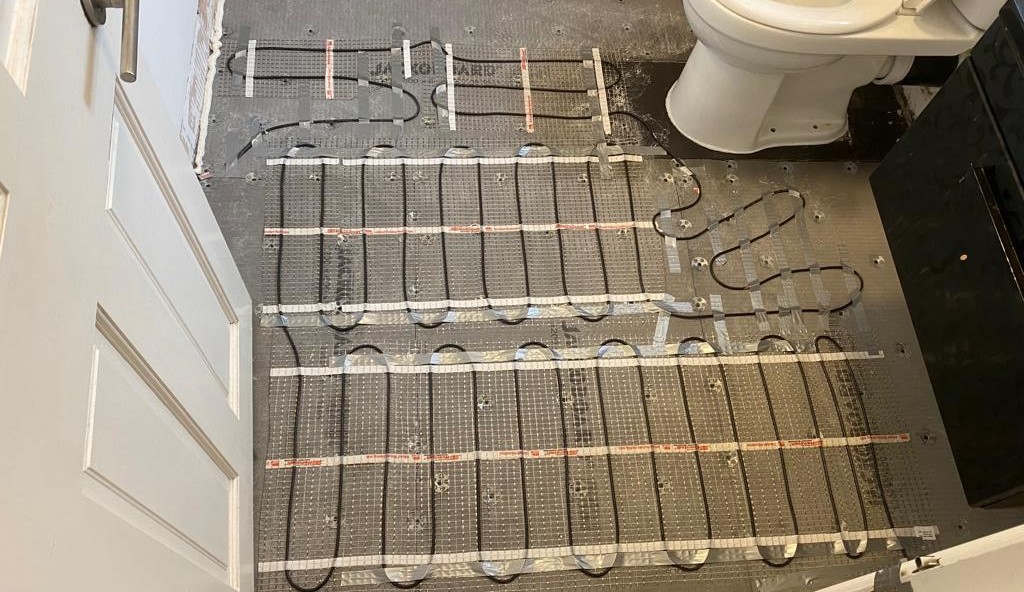
Step 9: Floor Sensor
The floor probe must be installed within the conduit supplied and taped over. Please position the floor probe between two loops of heating cable. The sensor cable must be a minimum of 2cm from either heating cable.
Step 10: Secure with Cloth Tape
After the mats are in place, firmly secure all edges with cloth tape. This ensures that the mats stay fixed in their position and are ready for the final floor covering to be installed. For Webtech/loose cable systems, ensure that the mats or cables are firmly laid down and adequately taped to maintain their position. This is a critical step in providing a secure and efficient installation.
Step 11 Self-Levelling Compound Application (WEBTECH/LOOSE CABLE ONLY)
 Prepare the flexible self-levelling compound as
per the manufacturer's instructions. Carefully spread the compound over the
heating elements, ensuring a smooth and level surface. Expanding foam is used
to stop self-levelling compound spill out onto areas that don’t need it.
Different floor coverings may require different thicknesses of the compound so
always refer to the manufacturer's guidelines.
Step 12: Flooring Installation
Engineered wood, laminate, and carpet with underlay can be floated directly over our foil heating mats.
Tiles can be used over the Webtech mats with flexible tile adhesive however it is still advisable to use flexible latex self levelling compound to ensure the best finish.
Vinyl or other bonded floor coverings require the Webtech system to be encased in a minimum of 10mm flexible latex self levelling compound (this can vary by manufacturer so always check with your preferred latex brand). Once the flexible self-levelling compound has set and dried according to the manufacturer’s instructions, you can proceed to install your chosen flooring.
Underfloor Heating Electrics
Testing: Your electrician should always perform both the resistance test and the insulative resistance test before and after the flooring is laid. A simple multimeter test will not detect a nick in the cable.
 Prepare
the electrical supply: They would ensure that the electrical supply to the area where the underfloor heating will be
installed is turned off at the main circuit breaker. This is crucial for safety to avoid the risk of electric shock.
They would then begin channelling into the walls to run cables from the spur or fuse board to the thermostat location.
Install the thermostat: The thermostat needs to be mounted in a suitable location within the room. Typically, thermostats are mounted on a wall at light switch height and away from direct heat sources or drafts.
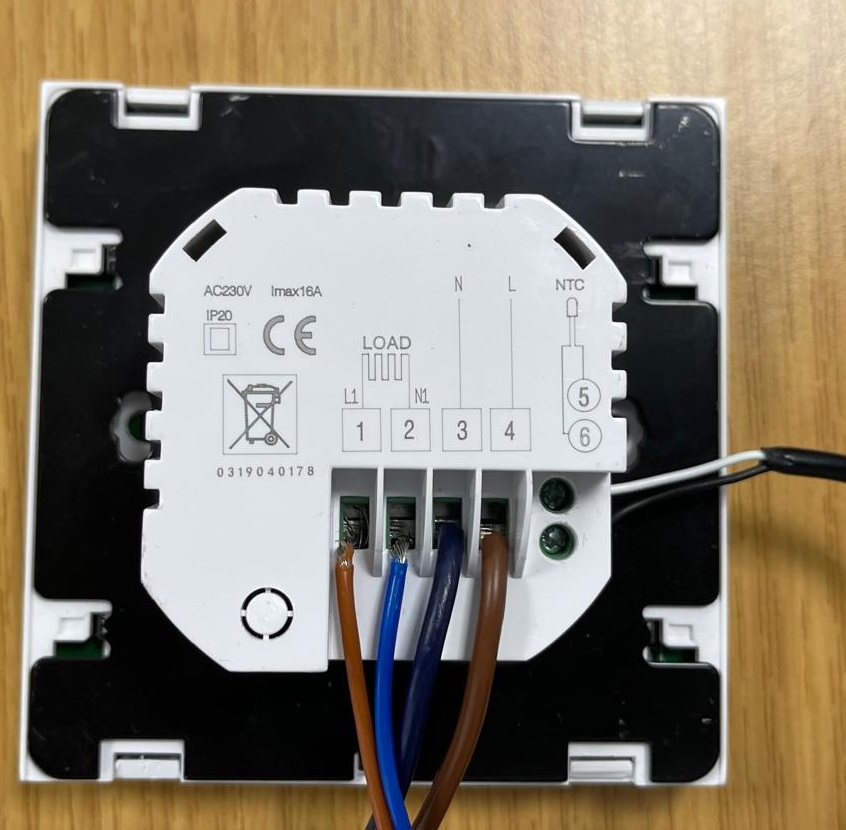 Connect
the thermostat to the heating system: Depending on the type of thermostat and heating system you're using, they’ll connect
the thermostat to the heating elements. This involves running the power cable from the heat mat to the thermostat. The
floor sensor would also be wired in at this time.
Test the system: After completing the wiring, it's important to test the system again to ensure everything functions correctly. The resistance tests should be carried out before and after laying the mats. An insulation resistance test is carried out once the system is wired up.
Warranty: Ensure you have the warranty paperwork filled out with all the required details, including the electrician's Part P number.
Using the Underfloor Heating
While you may be eager to start using your new electric underfloor heating system, it's essential to wait for the tile adhesive and/or self-levelling compound to fully cure before calling for heat. The curing process typically takes between 7 to 14 days, but it's crucial to consult the manufacturer's guidelines for confirmation.
General commissioning process (check with your floor supplier):
- Turn thermostat on and set suitable temperature depending on room.
- Allow it to sit for 24 hours.
- Gradually increase the temperature by a maximum of 1-2°C every 24 hours until you reach your desired temperature.
Following these steps will ensure a smooth electric underfloor heating installation. If you have any questions or need further advice, don't hesitate to contact our team for assistance.
Common Mistakes to avoid
- Ensure mat sizing is correct as mats cannot be shortened. If in doubt about size always consult our sales team for advice.
- Always ensure you have accounted for wastage with insulation boards as running short will mean unnecessary delays on site and having to reorder may incur additional postage charges.
- Ensure the thermostat is wired up correctly with heating mat and supply cables in the correct terminals.
- Always check the floor covering you are laying is suitable for the heat mat. If in doubt always consult our sales team for advice.
- If laying the Webtech system always ensure the insulation boards being chosen are correct for the subfloor.
Rayotec are always happy to supply materials and help with installation of our systems however we know that not everyone wants to get stuck in and would rather leave it to the professionals.
Please get in touch with your underfloor heating enquiry and we’ll be happy to get back to you.
CONTACT USFrequently Asked Questions
What our customers most commonly ask us about our installation service


